Monkey Map, advent of code 2022
Monkey Map
When the puzzle input is misleading
The input for this puzzle is particularly misleading and I didn’t bother to create a parser that could support both input variants.
Please keep in mind that this solution is designed to work with the puzzle input (the largest input) and not the test input.
This is because a grid requires two sets of transitions, the first one to solve part 1 and the last one to solve part 2.
If I had to support both input variants I would need 4 sets of transitions, 2 for each input variant. For the sake of simplicity we’re going to completely ignore the test input.
The puzzle input (I have divided each section with its face id, the original input isn’t like this):
....11112222....
....11112222....
....11112222....
....11112222....
....3333........
....3333........
....3333........
....3333........
44445555........
44445555........
44445555........
44445555........
6666............
6666............
6666............
6666............
The test input:
........1111....
........1111....
........1111....
........1111....
222233334444....
222233334444....
222233334444....
222233334444....
........55556666
........55556666
........55556666
........55556666
The Instruction Parser
The InstParser transforms the last line into a sequence of instructions.
The InstParser is very simple, it processes the line one character at a time; if the current character is not a digit it will produce a rotation instruction, in the opposite case it will produce a movement instruction with the surrounding digits.
The shape of an Instruction:
export class Instruction {
    steps: number;
    rotate_left: boolean;
    rotate_right: boolean;
}
The InstParser class:
export class InsParser {
    source: string;
    index: number;

    constructor(src: string) {...}
    get_instruction(): Instruction | null {...}
    advance(): void {...}
    is_complete(): boolean {...}
    peek(): string {...}
    parse_number(): number {...}
}
An example, the input 10R5 produces the following instructions:
10 -> { steps: 10, rotate_left: false, rotate_right: false }
R -> { steps: 0, rotate_left: false, rotate_right: true }
5 -> { steps: 5, rotate_left: false, rotate_right: false }
Generating the Grid
The get_grid function takes an input and a grid_size as parameters returning a 2d array of TileType.
The input should be the puzzle input excluding the last line.
function get_grid(input: string, grid_size: number): TileType[][] {
    const lines = input.split("\n");
    const grid: TileType[][] = new Array(grid_size);

    for (let i = 0; i < grid.length; i++) {
        grid[i] = new Array(grid_size).fill(TileType.VOID);
    }

    for (let dy = 0; dy < lines.length; dy++) {
        for (let dx = 0; dx < lines[dy].length; dx++) {
            if (dx < grid_size && dy < grid_size) {
                grid[dy][dx] = match_tile(lines[dy][dx]);
            }
        }
    }

    return grid;
}
It splits the text into lines, for every line we map each character with its matching TileType and returns the 2d array.
        #... -> 000000002111
...#.......# -> 111211111112
The TileType is an enum, but you could use a bunch of integers instead:
export enum TileType {
    VOID = 0,
    OPEN = 1,
    WALL = 2,
}
Generating the Faces
After that, the get_faces_list function takes the grid and generates 6 faces.
The faces don’t copy the grid data, but mark the start and end of a face.
function get_face_list(
    grid: TileType[][],
    cell_count: number,
    face_size: number
): Face[];
The parameter cell_count is the number of faces that fit inside the grid.
And face_size is the amount of individual cells a face contains.
# face 1
    top-left corner
    v
....11112222
....11112222
....11112222
....11112222
       ^--bottom-right corner

# face 2
        top-left corner
        v
....11112222
....11112222
....11112222
....11112222
           ^--bottom-right corner
To use this information later we store it inside the Face class:
class Face {
    id: number;
    top_left: Vector2;
    bottom_right: Vector2;
    size: number;
}
Processing Instructions
We start in the top-left corner of the first face, facing the RIGHT direction.
Here’s the BoardState type:
export type BoardState = {
    x: number;
    y: number;
    facing: Facing;
};
The board state keeps track of the location and facing direction in the “board”. We will mutate this object to generate the final password.
The Facing enum:
export enum Facing {
    RIGHT = 0,
    DOWN = 1,
    LEFT = 2,
    UP = 3,
}
You might be wondering why did I chose that order specifically. Please note that the order of Facing matters, as you will promptly see.
We process every instruction until there are no more instructions to process. An instruction can either be a rotation instruction or a movement instruction.
Rotation Instruction
Before calling process_rotation, we check that it is a rotation instruction.
The process_rotation function adds or subtracts one from the current facing direction; if the facing direction is greater than 3, it wraps around to 0, if the facing direction is less than 0, it wraps around to 3.
The modulus operator isn’t consistent across programming languages, so I had to implement my own.
function process_rotation(inst: Instruction, facing: Facing): Facing {
    if (inst.rotate_left) {
        facing -= 1;
        if (facing < 0) facing = Facing.UP;
    } else {
        facing += 1;
        if (facing > 3) facing = Facing.RIGHT;
    }

    return facing;
}
Let’s say that facing direction is RIGHT and we call process_rotation, the new value of facing direction will be DOWN.
If we repeat the process several times:
RIGHT -> process_rotation -> DOWN
DOWN -> process_rotation -> LEFT
LEFT -> process_rotation -> UP
UP -> process_rotation -> RIGHT
Move Instruction
We start by simulating every step, we get the next position from the current position and the direction.
let steps = inst.steps; // steps from current instruction

while (steps > 0) {
	const dir = directions[board.facing];
	let next_pos = vec2(board.x + dir.x, board.y + dir.y);
	steps--;
We get the direction using the facing direction.
const directions = [vec2(1, 0), vec2(0, 1), vec2(-1, 0), vec2(0, -1)];

const dir = directions[board.facing];
If the next position is inside the face bounds; We check if the next position is a wall tile, if that’s the case, cease any movement. Otherwise if the next position is an open tile, set the current position to the next position.
if (Grid[next_pos.y][next_pos.x] == TileType.WALL) {
    break;
}

if (Grid[next_pos.y][next_pos.x] == TileType.OPEN) {
    board.x = next_pos.x;
    board.y = next_pos.y;
}
Wrapping around the Cube
If the next position is outside the face bounds, we have to find the next face and next facing direction. In order to do so we need to get the correct transition.
Glorious Transitions
Transitions are stored in a 6x4 matrix, a transition is a tuple of face id and facing direction. To get a transition we need the id of the face and the direction to connect to the next face.
I couldn’t find a “smart” way to generate the transitions, but it could be worse.
Each row represents a face, each column represents a single transition in the desired direction.
const transitions = [
    //      0       |        1      |       2        |      3         |
    [trans(1, RIGHT), trans(2, DOWN), trans(3, RIGHT), trans(5, RIGHT)], // 0
    [trans(4, LEFT), trans(2, LEFT), trans(0, LEFT), trans(5, UP)], // 1
    [trans(1, UP), trans(4, DOWN), trans(3, DOWN), trans(0, UP)], // 2
    [trans(4, RIGHT), trans(5, DOWN), trans(0, RIGHT), trans(2, RIGHT)], // 3
    [trans(1, LEFT), trans(5, LEFT), trans(3, LEFT), trans(2, UP)], // 4
    [trans(4, UP), trans(1, DOWN), trans(0, DOWN), trans(3, UP)], // 5
];
const { face: new_face_id, dir: new_facing } =
transitions[face.id][board.facing];With the next face and next facing direction in place, we can call resolve_position to get the wrapped position.
function resolve_position(
    pos: Vector2,
    from: Face,
    from_facing: Facing,
    to: Face,
    to_facing: Facing
): Vector2;
The Math behind Transitions
For this puzzle I made a few cubes using paper and pencil. They were pretty useful, I could easily check connections between faces and calculate the new facing directions.
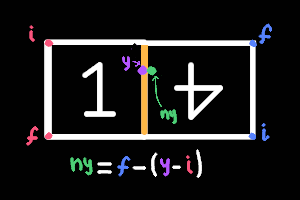
- the red i is the lowest y value of the left face
- the red f is the highest y value of the left face
- the blue i is the lowest y value of the right face
- the blue f is the highest y value of the right face
For instance, look at the previous face transition, we need to get the distance from left.i to y, to do that we use (y - left.i); next subtract the distance (y - left.i) from right.f.
The resulting new y position is: ny = right.f - (y - left.i).
For the new x position, we set it to the maximum x position of the right face. Which is to.max_x in code.
Every transition involves similar transformations, since I had the cube it wasn’t hard to generate them.
const res = { x: pos.x, y: pos.y };

if (from_facing == to_facing) {
    if (pos.x > from.max_x) res.x = to.min_x;
    else if (pos.x < from.min_x) res.x = to.max_x;
    else if (pos.y > from.max_y) res.y = to.min_y;
    else if (pos.y < from.min_y) res.y = to.max_y;
} else {
    if (from_facing == Facing.LEFT && to_facing == Facing.RIGHT) {
        res.x = to.min_x;
        res.y = to.max_y - (pos.y - from.min_y);
    } else if (from_facing == Facing.RIGHT && to_facing == Facing.LEFT) {
        res.x = to.max_x;
        res.y = to.max_y - (pos.y - from.min_y);
    } else if (from_facing == Facing.UP && to_facing == Facing.RIGHT) {
        res.x = to.min_x;
        res.y = to.min_y + (pos.x - from.min_x);
    } else if (from_facing == Facing.RIGHT && to_facing == Facing.UP) {
        res.x = to.min_x + (pos.y - from.min_y);
        res.y = to.max_y;
    } else if (from_facing == Facing.LEFT && to_facing == Facing.DOWN) {
        res.x = to.min_x + (pos.y - from.min_y);
        res.y = to.min_y;
    } else if (from_facing == Facing.DOWN && to_facing == Facing.LEFT) {
        res.x = to.max_x;
        res.y = to.min_y + (pos.x - from.min_x);
    }
}
Finally, a Password!
To generate the password all that’s left to do is to call generate_password.
function generate_password(board: BoardState): number {
    return (board.y + 1) * 1000 + (board.x + 1) * 4 + board.facing;
}
And that’s it, with that we have solved Day 22 successfully.
Overall, I really liked this puzzle because it seemed daunting at first glance, but once you break it down and take your time, it becomes a challenging but fun experience.
I took my time to build some cubes and I enjoyed the process of writing the transitions.
At first I tried to break everything down into smaller functions, but I soon realized that it wasn’t helping me to solve the problem.
So I decided to write the dirtiest and simplest code, improving it over time.
Thanks for reading! :>
If you’ve made it this far; well, thank you.
Thank you for taking the time to read this! Here, some cubes for you:

